
Sell merchandise, spirit wear, and sponsorships, and collect donations during registration, and from the website (through your online store). Everything you are selling or collecting money for must be created as "items" in the Merchandise catalog in the admin console (Manage Team > Merchandise).
Covered in this Article:
Fundraising Through Your Team Site
- Blog Posts
- Setting Up a SwimOutlet Store on Your SwimTopia Site
- Accepting Donations: Swim-a-thon, Coaches Gift, Scholarships
- Corporate and Family Sponsorships
- Heat Sheet Sales
- Sporfie Live Stream Fundraising
Creating and Managing Your Items
- Adding Items
- Adding Options - Sizes, Colors, Pricing, Order Limits
- Updating Merchandise VS Creating New
- Archived Merchandise
Selling Location Options
- Selling During Registration
- Selling From Your Website (Team Store or any webpage)
- Linking to Another Vendor Site
Reports
Fundraising Through Your Team Site
Blog Posts
Our sales and marketing team is hard at work researching and referencing their personal experiences in the sports arena to provide our customers with tips on making the most of their fundraising efforts.
Read more about fundraising in our blogs:
➞ How SwimTopia Pays for Itself…and Then Some!
➞ Merchandise Tips
➞ Setting up a Sponsorship Program
Setting Up a SwimOutlet Store on Your SwimTopia Site
SwimTopia has partnered with SwimOutlet, the web's most popular swim shop, to streamline the management of your merchandise offerings directly from your SwimTopia team site!
As mentioned in our Merchandise Tips blog post, setting up a SwimOutlet Team Store not only saves your merchandise coordinators a ton of time and headaches, but your team can sell fundraising items and make cash back on every sale.
SwimTopia's mission is to ensure swim team management doesn't stand in the way of swim team fun! We hope this partnership alleviates this stress on your team volunteers and puts the F.U.N. back in fundraising!
➞ Check out our ▶️ Quick Feature Demo - Adding a SwimOutlet Team Store
➞ See the SwimOutlet Team Store Snippet article to set up your SwimOutlet Team Store
Accepting Donations: Swim-a-thon, Coaches Gift, Scholarships
In addition to marketing your merchandise, you can accept donations for events (i.e., Swim-a-thon), coach gifts, athlete scholarships, etc.
➧ From Your Website
You can add these donation and scholarship options to your website using the Online Store feature and set up donation amounts as merchandise items.
➧ On Your Registration Form
You can also add these options to your registration forms in the Merchandise tab as "Additional Merchandise." Parents can have a one-stop shop experience when they register.
We've provided instructions for implementing either or both options in the Selling Options section below.
Corporate and Family Sponsorships
You can create your sponsor levels, and provide an opportunity for corporate and family sponsorship purchases from your website and during registration.
Teams can include these options in the registration form in the Merchandise tab as "Additional Merchandise." so parents can purchase on behalf of their company, or as a family sponsor.
Some teams will set up a specific "Sponsorships" page on their website to provide detailed information about the sponsorship levels, the perks, options to purchase online, and who to contact as needed.
For example - https://www.lhsplashers.com/sponsorships
➞ See the Sponsorships Help Center article for how to set up your sponsors.
Heat Sheet Sales
Teams using our meet management system, Meet Maestro, can also fundraise by selling their heat sheets. To entice sponsorship sales, these teams can include the sponsor logos or names using the "heat sheet banner" feature when setting up your sponsors in SwimTopia.
➞ See the Heat Sheet Banner section of our Sponsorships Help Center article for details.
Sporfie Live Stream Fundraising
SwimTopia has partnered with Sporfie to offer our customers with another fundraising option!
Sporfie is an easy-to-use live streaming and fundraising platform that allows users to stream and share practices or meets using nothing but their phone (without having to even log into an account). Sporfie is versatile and can be used by athletes to celebrate exciting races, coaches to analyze swim strokes, or parents to simply peek into a practice.
To sum it up, Sporfie:
- Allows you to live stream your meets & practices–anytime, anywhere
- Is FREE for families, friends, and fans to watch
- Provides picture-in-picture for enhanced viewing
- Is cloud recorded for playback on demand
- Allows your team to raise thousands of dollars in one quick fundraiser*
➞ Learn more here: https://www.swimtopia.com/swimtopia-has-partnered-with-sporfie/
Creating and Managing Your Items
Adding Items
To create a new item to be available for purchase, click +Add Merchandise Item.

Enter the details and an image to describe your item, including whether it can be personalized.
➧ Image Formats: PNG, JPG, and GIF are accepted, but PNG is best for websites.
» Note: Gender-specific items such as team suits will automatically display for each athlete during registration according to his or her gender. SwimTopia will not calculate sales tax. If you need to include tax, add it to the item price.
Click Save to save your new item in the Merchandise list.
Adding Options - Sizes, Colors, Pricing, Order Limits
- Options such as sizes, colors, etc. can be added to any merchandise item.
- Each individual "option" offered can have its own price if it differs from the default you set when you created the item.
- You can also set each size/option to have its own order quantity limit*. Once an option is sold out, it can not be ordered until that limit is increased.
» *Note: Order quantity limits can only be set if an item has options (i.e., t-shirt sizes). If you need to limit other items, such as caps, visors, yard signs, etc., you have to create the item as an option also, so you can set a limit that can be enforced. If you do not do this, you must monitor and remove an item when the limit you have to fulfill is reached.
Add options by clicking Edit or by clicking the item title from the catalog items list:
To edit the name, default price, image, or personalization settings for your item, click Edit item.

To add sizes or other options, click +Add Option for each option offered.
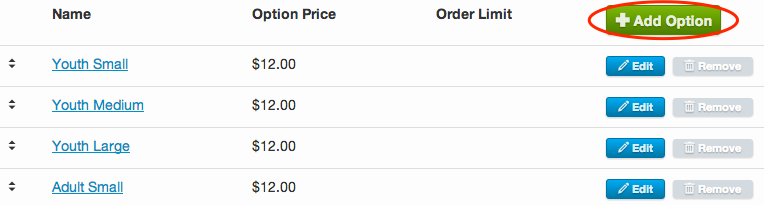
» Tip: The order of your options can be changed by clicking and dragging the items up and down.
For each new option, enter a name and whether that option requires a price override (a specific price for that option only) or an order limit.
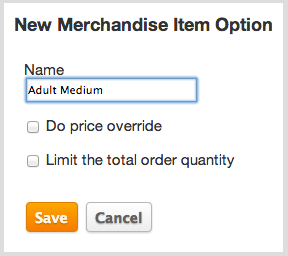
Click Save to go back to the item detail.
Items with limits will show as "sold out" during registration when all the options are gone. When purchasing from the online store, an error will display if a quantity is added to the cart that is over the limit:
Updating Merchandise VS Creating New
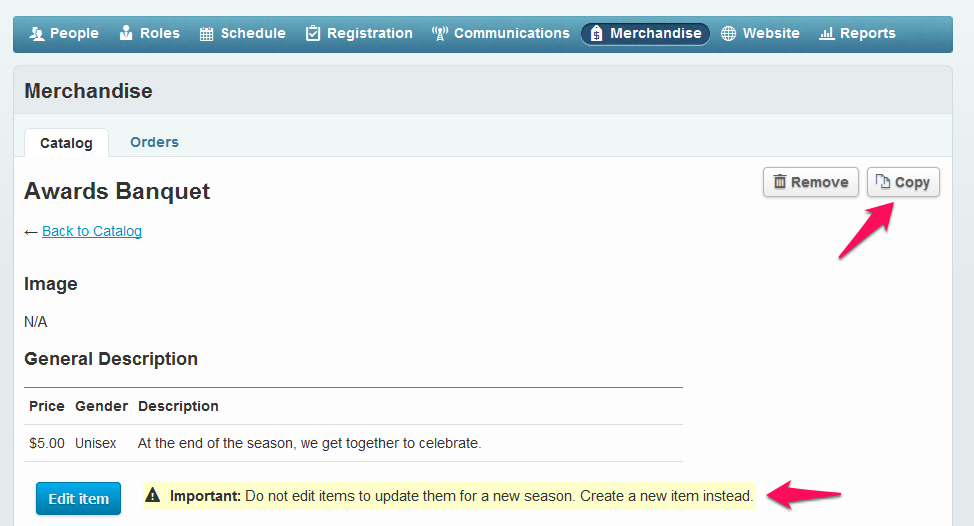
"Merchandise" items are not tied to seasons, so if you need to make changes after sales have occurred or when setting up for a new season, it’s best to create a new item rather than edit an old one. If you were to simply edit the old item, it would effectively change the description of the item for all past orders, too, and would affect tracking and reporting.
Also, if you have any merchandise items with order limits, SwimTopia will see last season’s orders as accumulating toward the overall quantity ordered.
If the changes to an item are minor, it may be easier to make a copy of last season’s item and then make your edits (rather than create a whole new item). Go to Manage Team > Merchandise, then click on the item, and click on “Copy.”
Archived Merchandise
You can “Archive” a merchandise item and have it not show in your catalog. You can also choose to display archived items and restore them to the catalog. Archived items are not deleted, they just don’t appear unless you choose to show them. Archived items won’t be an option when setting up offers in registration or your team store and offers using archived items will be removed from registration and the team store. Offers using restored items will reappear when the item is restored.
Selling Location Options
Selling During Registration
➧ Spirit Wear Sales
➞ See our article on the Registration: Merchandise Section to add your merchandise items for sale during registration.
➧ Donations & Sponsorships
Option 1: Include donation amounts in the Merchandise tab as an "Additional Merchandise" Option - parents can donate when they register to get it done all at once.
➞ See our article on the Registration: Merchandise Section to add your donation/sponsorship options for sale during registration.

Option 2: If you don't want to deal with creating "merchandise" items for donations, you could use an acknowledgment form on the main page of your registration to ask if anyone would like to donate to an athlete scholarship, coach's gift, etc. You would have to determine a specific price for this since you can only list one amount (unless you create more than one acknowledgment form to provide multiple price options), and you would make this optional.
You could also create a Role called "Team Scholarships" or "Coaches Gift" and select to have anyone who chooses to do this assigned to the Role so you have a good list to communicate with if you want.
➞ See the Acknowledgement Section of the registration Help Center article - Registration Form: Main Section
Selling From Your Website (Team Store or any webpage)
This feature is available to our Premium customers.
Spirit wear helps teams proudly look and feel like a team. Our online store lets you fundraise through your spirit wear sales. By creating a way for teams to easily work with their choice of dealer, sell items, and manage inventory, SwimTopia allows you to stay in charge of both your items and your proceeds.
➧ Online Payment Required
The payment account with Stripe (our vendor) must be set up from within your team site. Standard credit card processing fees apply (3.4% + 30c per transaction), and there is no option to push that fee to the buyer as is possible during registration.
➧ Website Display
Merchandise, donations, and sponsorship options can be displayed on any web page using our Merchandise Offer Snippet, so it does not have to be on your team store page to be visible, but you do have to enable the online store feature since any purchase outside of registration flows through the store checkout process.
➧ Guest Checkout
We do not currently support guest checkout. If a non-member wishes to purchase merchandise, donate, or sponsor, they will either need to do this through a member, or you can set up a "Guest" account to allow visitors to donate.➞ See our Community post on this topic Guest Checkout.
➧ Donations & Sponsorships
You can accept these donations through the Online Store by setting up donation amounts as merchandise items. Here's how:
- Enable the Online Store feature (under Manage Team > Website)
- Create donation amounts as Merchandise "items" (under Manage Team > Merchandise)
- Display these donation "items" on your store or any webpage using the Merchandise Offer Snippet (access snippets from your Welcome menu > Edit Page or Template Content).
- Orders will show up under Merchandise > Orders. ➞ See Managing Online Store Orders
We've provided step-by-step instructions in a post on our Community page - Using the Online Store for Donations
➞ Donation Amounts: The online store does not allow for manual entry of any dollar amount by the purchaser, but you can set up one donation item with multiple pricing options. If you don’t want to provide specific amount options (like $25, $50, $75, $100...), you could offer a donation amount that is small enough that people can “order“ multiple amounts. For example, you could set the donation amount to be $5 and if they wanted to donate $25, they could order 5 of them.
➧ Additional Swim-a-thon Options
If our option will not work for your "Swim-a-thon" fundraiser, you may find an option like https://www.dojiggy.com/athon-software/ useful, but donations are managed outside of the team website.
» Note: Swim-a-Thon is a registered trademark owned by the USA Swimming Foundation. Any pledge-for-length event branding that resembles a Swim-a-Thon, including lap-a-thons, aqua-thons, pool-a-thons, or other similarly branded programs involving lap swimming, is a violation of this trademark.
➧ Meet Entry Fees
Meet Entry Fees can be tracked but not collected online during meet signup. You can add this fee as a merchandise item to collect during registration or through the online store. For more information on Meet Entry Fees, ➞ See the Meet Templates article.
Linking to Another Vendor Site
If you have items for sale through a swim shop other than SwimOutlet, there are a few options depending on how you want to link to your vendor:
➧ Option #1: Text area snippet with link to vendor site
You can include a link on any page using a Text Area snippet - If you just have a link, you can put that in a text area anywhere on your site. You can also include it in your registration confirmation message.
➧ Option #2: Create a new page with an alias to the vendor site
Add an Alias on a merchandise page you create to lead to the vendor's online store - See the Alias section of our online help article Managing Menus and Navigation and ▶️ Training Videos: Your Site's Content and Appearance)
➧ Option #3: Use "embed code" or "widget" to link to the vendor site
If they provide “embed code” or “widget” ➞ See Embed a Widget—custom code from other sites
Let us know if you need help setting it up. Submit a support ticket with the information.
Reports
Merchandise Reports
Regardless of how you utilize the "Merchandise" feature, the reporting options you will reference will depend on where you are selling these items.
➧ Registration Orders: Viewable from the Registrations > Registrants# page, or from the Reports page
➧ Online Store Orders: Viewable from Merchandise > Orders (link to the page provided from the Reports page)
➧ SwimOutlet Team Store Orders: Viewable from SwimOutlet only
» Note: If selling via registration and the store, you'll need to run two different sets of reports to capture orders. (Integrated reporting is not available at this time, but has been requested. Separate reports are beneficial when teams sell via the store after registration or sell completely separate items in each location.)
See ➞ our Merchandise Reports - Registration and Online Store Orders article for details.
hcmanagemerchandisecatalog hcmanagemerchandiseorders
Comments
0 comments
Article is closed for comments.