This feature is available to our Premium customers.
Your website's page order and properties can be easily modified from two locations.
When logged into your website, click Edit Navigation in the Manage Website section on the Admin menu.
Or, from the Manage Team menu, click Website.
![]()
>>Note: Your site's pages will be listed in the order they appear on your website's main navigation menu, with nested pages indented underneath their parent pages.
To set up new pages ➞ See our tutorial on Creating and Editing Pages
Covered in this Article:
Moving Pages
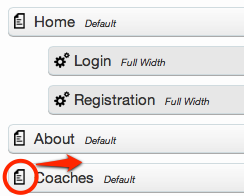
To move any page to a different location, make a page a nested page or make a nested page a main page, just click and drag the page icon to the location you like. Sub menus on your site will be created or moved automatically. At this time, only two levels of navigation are possible.
For example, to make the Coaches page a nested page under the About page, click and drag that page icon to the right until it clicks into place right below the About page.

>>Tip: If you see the following message at the top of your Website > Pages screen, take note of it and consider how you could decrease the number of top-level headers by moving one or more underneath others. If you experience any issue clicking on your sub-headings and not going anywhere, this is due to having too many top-level headings that are interrupting your sub-level headings.
>>Tip: No page should be above your Home page since that will be what people land on when they go to your site. If you were to move Login above Home, everyone would see the Login screen and this would be confusing.
Smart Pages
Smart pages are indicated by a small gear icon - . Smart pages automatically display News Posts, your Schedule (as set up under Manage Team > Schedule), Registration, and Login pages and can not be added manually or deleted.

You can rename your Smart Pages by clicking on "Properties," and you can move them to where you'd like them to appear in your navigation. However, these pages should never be repurposed—in other words, the Swim Meet Page should always just be the page where swim meets are displayed (even if you change the name).
>>Tip: We suggest you do not change the hidden status of the Login and Registration pages. These are pages that display automatically as needed. The Login page displays when login is required. And when you open/close your registration forms, the Register Now snippet (below) will automatically display (as long as you do not delete this snippet, which we implore you not to ever do).
Adding an Alias
An Alias is a link or title in your site's navigation that contains no content but only links to another page. It can be useful to have several links in your navigation point to one content page or external URL without duplicating the content.

>>Note: Entering "#" in the external URL box will keep your page from going to a landing page. It will become a header that does not go anywhere. This would just be useful if you have sub-pages below this one.
Click Create to save your alias or Cancel to go back to your pages list.
Once your alias is saved, you can move it anywhere in the navigation you like. If you use aliases, do not change the target page's path (see below) as this will break the link from the alias to that page.
▶️ Training Videos: Your Site's Content and Appearance
For an overview of nesting pages, using alias pages, and organizing the pages within your site ➞ See our ▶️ Training Videos: Your Site's Content and Appearance article.
hcmanagewebsitepages

Comments
0 comments
Please sign in to leave a comment.