
We've compiled error scenarios that we have encountered while assisting our customers through the CTS System 6 or Gen7 setup process. If your issue is not covered in one of the above scenarios, you can contact Swimtopia Support for help.
» Note: Our system should work with CTS System 5, but we are not making any updates beyond how it works today. CTS System 5 is no longer listed on Colorado Time Systems as a supported timing system.
Covered in this Article:
➧ Integration Connection Requirements
➧ Issue Scenarios
- Unable to detect console
- Ports are detected, but they are busy
- Event Sequence: Accidentally changed and need to change back to default.
- Attempting to change meet - Stuck on "Loading meet options..."
- Wrong times / No times loading / Can't find correct meet - (CTS date/time issue)
- Event labels are incorrect in my CTS interface
- Alphanumeric event numbers are unsupported
- Using CTS touchpads and backup plungers- want to use plunger times
➧ Error Scenarios
- Can't connect to Gen7 - Data Integrity Check Error
- Timer In Setups Screen
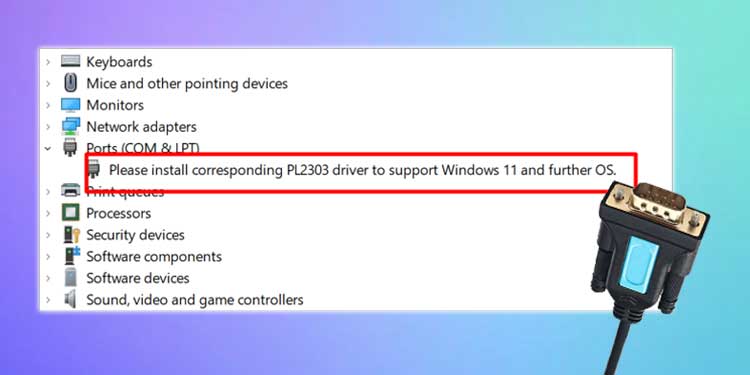
- Install the corresponding PL2303 driver to support Windows 11
- Write verification failed or data integrity check failed
- Could not init port: Opening COM3: Access denied
- Cannot set properties of undefined (setting 'isFromScan') - No times loading
➧ Product Support
Integration Connection RequirementsCommunication between the CTS timing console and Swimtopia Meet happens through a serial port.
|
➧ CTS System 6 |
|
The type of connection used by the CTS System 6 is a serial RS-232 cable. Connecting a CTS 6 to a modern computer requires a special USB-to-RS-232 adapter cable, which also requires a software driver to tell Windows how to work with the cable (because it is not a normal USB connection). There are different vendors of these USB-to-RS-232 cables - example device.
|
➧ CTS Gen7 |
|
For CTS Gen7, the USB to serial port conversion is handled inside the timing console, so a simple USB cable is sufficient.
|
Issue Scenarios |
➧ Unable to detect console |
➞ Likely CauseWhen you initialize the timing system, if it halts on this step and provides the error - Unable to detect CTS System 5/6 console (or Gen7), then Swimtopia Meet does not see any serial ports in your system. There is likely a hardware or Windows driver issue. Follow the steps below. ➞ ResolutionStep 1: Follow the suggested steps to resolve the issue depending on your specific system:General Confirmations:
CTS System 5/6:
CTS Gen7:
Step 2: Click the Retry button.Step 3: If the issue still persists, verify that Windows detects the serial port:Open Device Manager Verify that your device is displayed under ‘Ports (COM & LPT)’. » Note: Windows selects the COM port number for you and it may differ from this example (‘5’ in this case). Make note of the number as we will use it in a later step. If the ‘Ports’ category is missing, Windows did not detect your device! To tell Windows to scan for devices select the menu Action -> Scan for hardware changes
Step 4: Verify that Windows has valid drivers installed:Right-click on your device. Select Properties. A device with a properly installed driver will look like this. If you see errors in Device status, try updating your driver. Step 5: At this point, Swimtopia Meet should be able to connect to the device. If you are still experiencing issues, Contact Colorado Time Systems for additional assistance.
|
➧ Ports are detected, but they are busy |
➞ Likely CauseWhen initializing the timing system, if it halts on this step and lists one or more ports with errors that say Resource busy then there are two typical causes:
➞ ResolutionStep 1: Close any other applications which might try to talk to a CTS console.Step 2: Open Device ManagerStep 3: Open the section titled ‘Ports (COM & LPT)’.Step 4: Unplug the USB cable from your computer. You should see a COM Port device disappear from the list.Step 5: Reconnect the cable. You should see the device reappear. Take note of the COM port number.Step 6: Retry the connection in Swimtopia Meet.
|
➧ Event Sequence: Accidentally changed and need to change back to default. |
|
Swimtopia Meet will write the event sequence to the default slot #9. It is unlikely that you will need to change this, but if you did so on accident and you're not sure how to change it back, here is how: Step 1: From the Timing Setup screen, click the "Change" link next to the Target Sequence.Step 2: Change the location back to the default slot (#9).
|
➧ Wrong times / No times loading / Can't find correct meet - (CTS date/time issue) |
➞ Likely CauseThe CTS system date/time is wrong due to a dead battery, and the wrong meet was selected. ➞ BackgroundMeets are identified by timestamp in the CTS Console. By default, Swimtopia Meet will select the most current date as the ‘Selected CTS Meet.' The CTS System 6 console has a built-in battery. If the battery is not charged and dies, or is drained from being unplugged for too long, the CTS will not have its system time set correctly to select the most recent meet. ➞ How to Verify the CTS System 6 Date/TimeIf your screen is displaying the error above and you hover over the "?" tooltip, you can see where the CTS Sys 6 console displays the date/time: ➞ Resolution: The meet has NOT started1. Update the CTS console's date/time - How to update the CTS date/time. 2. Create a new meet in the CTS console. 3. Select the correct meet in Swimtopia Meet - How to select a CTS meet in Swimtopia Meet. ➞ Resolution: The meet HAS startedThis is usually the case where CTS was running with the correct date/time, times were coming into Swimtopia Meet correctly, but then the power is "cut" from the system. When back up, CTS doesn't have the correct date/time set and has created a new meet with the default 2002 date. ➞ Option 1 (Trial and error) - It's likely the "oldest" meet, so select a meet and pull the times to see if they are what you expect. - How to select a CTS meet in Swimtopia Meet. ➞ Option 2 - If finding the meet is not working, a new meet will need to be created. If races were run after the power outage, those will have to be hand-entered. 1. Stop the meet. 2. Update the CTS console's date/time - How to update the CTS date/time. 3. Create a new meet in the CTS console. 4. Select that CTS meet in Swimtopia Meet - How to select a CTS meet in Swimtopia Meet. ➞ How to Set the CTS System 6 Date/TimeStep 1: Select "Setups"Step 2: Navigate to “Set Date/Time”Step 3: Press 1 to set Time of DayStep 4: Press 2 to set DateStep 5: Select "Save Setups"➞ How to Select a CTS MeetOnce you know the date and time of the CTS meet are set correctly, return to Swimtopia Meet and press the gear icon to access the CTS settings. » Note: The "Return to current meet" button is only displayed in Gen7. This can also be accomplished from the Timing Setup screen in Settings: ➞ Another Possible Cause: A test race is needed to 'write the meet'If the battery is not the issue, you may need to run a test race. The CTS console needs to first write the meet, for Swimtopia Meet to detect the meet from the CTS console. This doesn't take place until after the first times are captured. It's important to run a "test heat" on the CTS console to connect to the correct Meet from Swimtopia Meet. You do not need to progress to the next event/heat on CTS, but it must capture the times in order for the CTS console to begin writing the required files. If the CTS system date/time is not the issue, the need for a test race might be. |
➧ Event labels are incorrect in my CTS interface |
➞ Cause and ResolutionSometimes, the CTS interface does not immediately update after writing the Event Sequence.
➞ Cause and ResolutionSomeone changed the Event Sequence data using the CTS console.
|
➧ Alphanumeric event numbers unsupported |
➞ CauseAlphanumeric events are not supported by the CTS Consoles. » Tip: We strongly recommend users not use alphanumeric event numbers with the console. It will sort of work, but only if all alpha events have the same distance. For example, ‘1A’ and ‘1B’ are both 50 yards, but different competition categories or age groups. If you have no choice, here is what happens:
If the alpha events have different distances, then the last distance will win and the console will be confused about the number of lengths and therefore capture the final time too early or late.
|
➧ Using CTS touchpads and backup plungers- want to use plunger times |
| If your team is using Swimtopia Meet with CTS touchpads plus a backup plunger, the pad time is considered the official time, and the plunger time is recorded as a backup (but is ignored). If the backup time is needed, the meet admins can use the Time Adjustment form to select the plunger time instead. |
Error Scenarios |
➧ Can't connect to Gen7 - Data Integrity Check Error |
|
Receiving ‘Data Integrity Check’ error, followed by ‘Access Denied’ errors. ➞ ResolutionUntil CTS resolves this issue on their end, they have provided a button to ‘Reset the Meet Management interface’
|
➧ Timer In Setups Screen |
|
If this error state is detected with your timer console, we will provide a configuration error message. ➞ ResolutionExit the 'Setups' screen/menu on the CTS by pressing 'Quit'. Once you have resolved the issue, you can select to RETRY.
|
➧ Install the corresponding PL2303 driver to support Windows 11 |
|
This message means that your USB-to-RS232 serial cable adapter uses a chipset made by Prolific and the version of the Prolific driver software installed does not support Windows 11. ➞ ResolutionThe driver software needs to be updated to resolve this issue.
In some cases, it is the most recent Prolific driver version that is incompatible; thus, reverting to a previous/older version of the driver may be required. Please refer to these external troubleshooting guides to resolve this specific issue: Fixed: Prolific USB to Serial Driver not Working on Windows 11/10 (Includes Video) Fix: "Please Install Corresponding PL2303" Driver Issue on Windows 11
|
➧ Write verification failed or data integrity check failed |
|
You are not able to write the meet events into the CTS, and you are presented with either 'write verification failed' or 'data integrity check failed' ➞ ResolutionIn order for Swimtopia Meet to detect the meet from the CTS console, the CTS console needs to first write the meet. This doesn't take place until after the first times are captured. So, it's important to make sure you run a "test heat" on the CTS console in order to connect to the correct Meet from Swimtopia Meet. You do not need to progress to the next event/heat on CTS, but it does need to capture the times in order for the CTS console to begin writing the files needed.
|
➧ Could not init port: Opening COM3: Access denied |
|
You're trying to connect your computer, running Swimtopia Meet on Windows, to CTS System 6, and you get this error message: Could not init port: Opening COM3: Access denied. ➞ Debug StepsThe error "Opening COM3: Access denied" typically occurs when another piece of software obtains a 'lock' on the port. Please give the following steps a try: 1. Unplug the Serial to USB cable from your laptop
|
➧ Cannot set properties of undefined (setting 'isFromScan') - No times loading |
|
Product Support"Customer Happiness" is not just a team name at Swimtopia - it's our mission!
|
➧ Colorado Time Systems Support |
|
If you have questions specific to your CTS system or setup, please reference their support resources below. Swimtopia Meet seamlessly integrates with CTS to pull in times, but they are the experts at helping you configure your CTS System.
|
➧ Swimtopia Support |
|
If your issue is not covered in one of the above scenarios, feel free to contact Swimtopia Support for assistance.
|
➧ Finding Help Resources in Your Meet |
|
We're here to help! If you need assistance before or during your meet, we want you to be able to reach us as quickly as possible. Click on the You can download logs under the settings on the timing system bar to provide in your support ticket. We also provide a remote troubleshooting option under the Help icon to create a read-only replay of the steps you are taking when an issue occurs. Before reaching out to us, slide the bar to Enable Remote Support, and retrace your steps to recreate the issue. Include the "Session Id" in your ticket or call. |
Comments
0 comments
Please sign in to leave a comment.