
PREMIUM
This feature is available to our Premium customers.
Many teams purchase custom domain names for their websites and want to use them with their SwimTopia / Team Topia (non-swim) websites. Supporting custom domain names while providing a high level of security usually requires making some trade-offs. (See our Enhanced Custom Domain support blog post),
Cloudflare's FREE Universal SSL service allows us to provide the best of both worlds: full custom domain support and top-notch security.
Covered in this Article:
➧ Cloudflare Details
➧ Cloudflare Setup Steps
- Step 1: Start your Cloudflare Account Setup
- Step 2: Buy a Domain Name (if needed)
- Step 3: Add your Domain to Cloudflare
- Step 4: Choose a Cloudflare Plan
- Step 5: Configure your Cloudflare DNS records
- Step 6: Add a root domain DNS record
- Step 7: Add a page rule to redirect your root domain
- Step 8: Make sure SSL setting is "Full"
- Step 9: Disable Rocket Loader **VERY IMPORTANT**
- Step 10: Enable Bot Fight Mode
- Step 11: Update your name servers
- Step 12: Enter your custom domain in your SwimTopia/Team Topia site
- Step 13: Request that we use your custom domain by default
➧ Troubleshoot: Setup and Management
- Cloudflare Errors
- My custom domain still leads to the old location
- Still need help? - Submit Ticket with DNS Setup Info
Cloudflare Details |
➧ What is Cloudflare and why do we use it? |
|
Cloudflare works by managing the DNS service for your website. The DNS service they provide is world-class with a global network of data centers and protects and accelerates websites, including many well-known sites like Etsy, Reddit, Yelp, and Salesforce.com. Switching your DNS service to Cloudflare does require some configuration changes at your domain registrar, but does not require you to transfer your domain name to be managed by Cloudflare (although we highly recommend registering with them for an easier process). |
➧ When is a Cloudflare account required? |
|
Configuring your SwimTopia or Team Topia (non-swim) site to work with Cloudflare will enable you to use a custom domain name "natively." This means you don't have to redirect from your custom domain to your provided SwimTopia/Team Topia URL ("example.swimtopia.com" or example.teamtopia.com). Your site should also be faster, and Cloudflare provides insightful analytics and an additional layer of protection against denial-of-service and other threats sometimes faced by websites. » Note: Setting up a free Cloudflare account is required to properly configure a custom domain without redirection, to be used by default with your SwimTopia / Team Topia site. |
Cloudflare Setup Steps (Follow Strictly) | ||||||
» Important: We provide specific steps to guide you through this process, but if custom domain setup is not your area of expertise, it's important to have access to a volunteer who can assist you. We provide a Troubleshoot: Setup and Management section at the bottom of this article, with an option to reach out for help, but we cannot access your custom domain setup to do any steps on your behalf. Please check/recheck your steps first if you run into any errors. | ||||||
➧ Step 1: Start your Cloudflare Account Setup | ||||||
|
Visit www.cloudflare.com and set up a new account if you do not have one already. Generally, you should set up this account using an email address that can be handed over to a future team computer administrator. Once you have added an email address, selected a username and password, and agreed to the terms of service, you should be guided through a Cloudflare setup wizard. | ||||||
➧ Step 2: Buy a Domain Name (if needed) | ||||||
|
If you haven’t already purchased a domain name, we highly recommend doing so through Cloudflare Registrar. This makes it easier to configure your domain for use with SwimTopia, as all required settings will be accessible directly in the Cloudflare dashboard. You may also purchase a domain name from a separate domain registrar such as Namecheap, Hover, GoDaddy, or Register.com. If you do, some extra configuration will be required to make your Cloudflare account work correctly with that registrar. Once you have a domain secured, proceed to step three. | ||||||
➧ Step 3: Add your Domain to Cloudflare | ||||||
|
In the “Add a website” step of the Cloudflare setup wizard, you should input the domain name for your website, something like example.com, and then click “Add site.” If you already use this domain for email or other services, Cloudflare will start by importing your existing domain configuration so that any existing services will continue to work with Cloudflare. When that process is done, you will verify and configure your records in step five. | ||||||
➧ Step 4: Choose a Cloudflare Plan | ||||||
|
In most cases, the Free plan is all that is needed to use CloudFlare and your custom domain with your SwimTopia website. | ||||||
➧ Step 5: Configure your Cloudflare DNS records | ||||||
Please follow the exact format. This is usually where people make a mistake, resulting in an error.First Step: Once Cloudflare has completed importing your existing records, you should review them to confirm your email settings (denoted by MX records) and other services are intact. If you only use the domain for your website, you may only have one or two records. Next Step: Add a new CNAME record to map “www” (or any other subdomain you chose) to a special DNS name corresponding to your SwimTopia or Team Topia website subdomain.
| ||||||
➧ Step 6: Add a root domain DNS record | ||||||
|
With a Page Rule in place to route all root domain traffic to the secure 'www' subdomain, we need to add a root domain DNS record so that CloudFlare can process that rule.
» Tip: Cloudflare uses "www" in their example under the field, but do not do that for yours. ➞ GoDaddy Customers - Important NotesIf your DNS was set up through GoDaddy, there may be additional top-level records that can interfere with your SwimTopia site loading properly. If there are any CNAME or A records that point to a specific IP address you will want to remove them. An IP address is an identifier like 172.16.25.41 that identifies a single device on the network. Your SwimTopia or Team Topia site isn't hosted on a single server, but instead "in the cloud" with multiple virtual servers that are added/removed automatically as traffic goes up and down. Thus, your SwimTopia / Team Topia service is never accessed via a specific, static IP address. That said, if you use your custom domain for email it will very likely have one or more MX records in your configuration with IP addresses. Don't remove those! Also, ➞ See Custom Domains: GoDaddy “Forward with masking” Not Supported if using this option. | ||||||
➧ Step 7: Add a page rule to redirect your root domain | ||||||
|
Generally, if someone types your root domain (e.g. http://example.com) you will want it to work just the same as if they had typed the ‘www’ subdomain (e.g. http://www.example.com). To support this we need to set up a Page Rule to redirect all requests sent to the root domain (without the ‘www’) to the equivalent ‘www’ subdomain. This is a good practice for your website visitors but is also a recommended practice for search engine optimization. Under Rules > Page Rules, click the Create Page Rule button: Your screen should look similar to the following:
(This rule will intercept all web requests to the root domain and redirect it to the www subdomain equivalent.) » Note: Be sure to replace example.com in the above examples with your own domain name. The https:// is very important. The $1 will make sure any other path info in the URL is also transferred to the 'www' subdomain. | ||||||
➧ Step 8: Make sure SSL setting is "Full" | ||||||
|
Check the "Current encryption mode" setting in your Cloudflare configuration under SSL/TLS and ensure it says "Full" and not "Full (Strict)." This will ensure all traffic to your website is encrypted end-to-end. "Full" (not "Full (strict)") is the only supported SSL/TLS encryption mode. ➞ Are you wondering why "Full" vs "Full (Strict)"?We have valid and publicly trusted certificates on our servers that provide the benefit of end-to-end encryption (this is what "Full" means), but they only cover the *.swimtopia.com domains. They are not configured specifically for your custom domain, as we rely on Cloudflare's service to provide the certificate for your custom domain. To support "Full (Strict)" we would have to procure, configure, and maintain a SSL certificate for your domain name on our servers, which is cost and time-prohibitive. » Note: it may take several minutes for this change to take effect. If you are experiencing “too many redirect” errors when trying to access your site, it is likely because the SSL setting is set to “Flexible” instead of “Full”. If you are experiencing "Error 525: SSL handshake failed" errors, it is likely because the setting is "Full (strict)" instead of "Full". | ||||||
➧ Step 9: Disable Rocket Loader **VERY IMPORTANT** | ||||||
|
CloudFlare offers a feature called RocketLoader that combines and compresses Javascript on your site for faster loading. This feature can have side effects, however, and can cause some issues with some SwimTopia functionality. We strongly recommend you disable Rocket Loader. Go to Speed > Settings > scroll to Content Optimization, and set Rocket Loader to Off. | ||||||
➧ Step 10: Enable Bot Fight Mode | ||||||
|
Bot Fight Mode is a simple, free product that helps detect and mitigate bot traffic on your domain. To start using Bot Fight Mode:
| ||||||
➧ Step 11: Update your name servers(Skip this if using the Cloudflare Registrar for your domain name) | ||||||
|
The last step of the Cloudflare setup wizard is to log in to your account at your domain registrar and update your name servers to configure your domain name to use your newly configured Cloudflare service. Cloudflare will provide names for 2-4 name servers. You will need to use these to update the name server configuration in your domain registrar account. The process for making this change is different for each provider. We've provided links to the support articles for some domain providers below. After completing this final step, you just need to wait for the name server changes to take effect and your domain should route through Cloudflare and to your SwimTopia site. (can take 24 hours or longer to take effect, but it often takes much less time) Cloudflare will automatically procure and manage a SSL-certificate for your domain. These certificates are required to protect the data transmitted to and from your site and are typically expensive and require a complex purchase and setup process. Cloudflare automates that process and provides an SSL certificate free of charge, but this process may also take up to 24 hours to complete. » Note: If your name server configuration updates before your Cloudflare SSL certificates are ready you may find that your site is accessible via your custom domain but with an SSL certificate warning/error. This error should go away as soon as the automated SSL certificate installation process is completed. | ||||||
➧ Step 12: Enter your custom domain in your SwimTopia/Team Topia site | ||||||
|
Permissions: The login used must have full Site Admin level permission, or be assigned to a Role with "Manage: Website" administrative privilege. From your Manage Team admin console, go to Website > Site Settings > Advanced. Input the desired domain for your site in the custom domain name field. 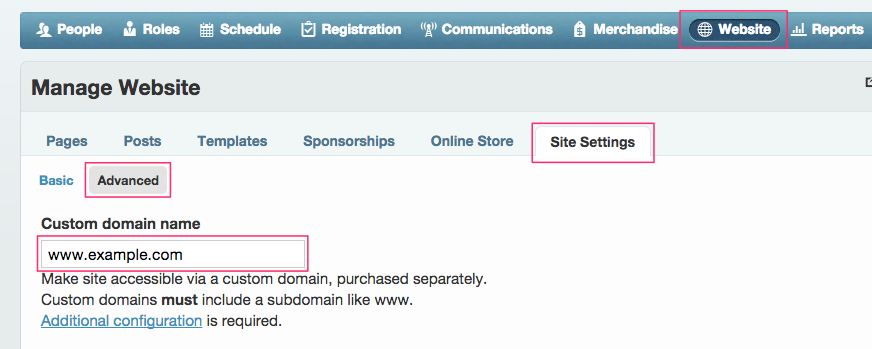 This step lets SwimTopia know that any requests it receives for this domain name should go to your website. It does not point your domain name to your SwimTopia site. For that, additional configuration is required, starting with setting up a Cloudflare account in step three. » Note: the domain name for the site must include a subdomain such as www as in www.example.com. | ||||||
➧ Step 13: Request that we use your custom domain by default | ||||||
|
Once your site is up and running with your custom domain, it will be accessible via either your custom domain (e.g. www.example.com) or your SwimTopia or Team Topia subdomain (e.g. example.swimtopia.com or example.teamtopia.com). After you've gone through the trouble of setting it up, you probably want to make sure your custom domain is the “default” domain for your site. This will redirect traffic to your custom domain if someone enters your subdomain, and any emails our system generates will use your custom domain in any links to your site. It provides consistency to your users, and can also help with the search engine ranking for your site, as all traffic and search engine ranking will be directed toward your custom domain, rather than split between your custom domain and your [team-name].swimtopia.com subdomain. To enable this feature ➞ Create a support ticket requesting that we “enable your custom domain by default”. (this is only possible with a Cloudflare account set up correctly)
» Note: Your "Manage Team" administration console will always be accessible via either your custom domain or your subdomain (e.g. https://example.swimtopia.com/manage). This provides a failsafe in the event your custom domain registration unexpectedly expires, or something else happens that makes your custom domain unreachable. You'll always be able to access your team management console — including the ability to remove the custom domain configuration under Website > Advanced > Settings if you need to. |
Troubleshoot: Setup and Management |
➧ Cloudflare Errors |
|
There are a multitude of errors that can occur depending on what step was missed. In many cases, errors will lead back to not having the CNAME record configured correctly. General Solution: If you receive an error, please go through each step above again, paying close attention to step 6 to confirm your DNS name is formatted exactly as required - your team's SwimTopia / Team Topia subdomain followed by ".dns.swimtopia.com" (or ".dns.teamtopia.com"). Examples: Below are some errors that have been resolved after updates to the CNAME or other setup steps above (as mentioned, errors can mean any number of things, so the key is to check each step when you receive one):
|
➧ My custom domain still leads to the old location |
|
When a domain is added to Cloudflare, Cloudflare will try to automatically copy any current settings for that domain into the Cloudflare configuration. If you are seeing any issues with your domain, the issue may be that Cloudflare copied the existing DNS configuration. How can you tell if this is the issue?
This would lead us to believe that in addition to the settings you added when following the steps above, there was an additional DNS configuration that was copied during the initial import, and this imported setting is overriding the configuration to point your domain to your SwimTopia site. |
➧ Still need help? - Submit Ticket with DNS Setup Info |
|
Without seeing your Cloudflare account we don't know if our hunch is correct, but we can confirm this if you submit a support ticket INCLUDING an export of your DNS setup (preferred), or screenshot. If we can see those details, we should be able to figure out why the Cloudflare to SwimTopia / Team Topia connection is not happening as expected. ➞ Option 1: DNS Setup Export (Preferred)➞ Option 2: Screenshot of the "DNS" ScreenIt should look something like the screenshot below: 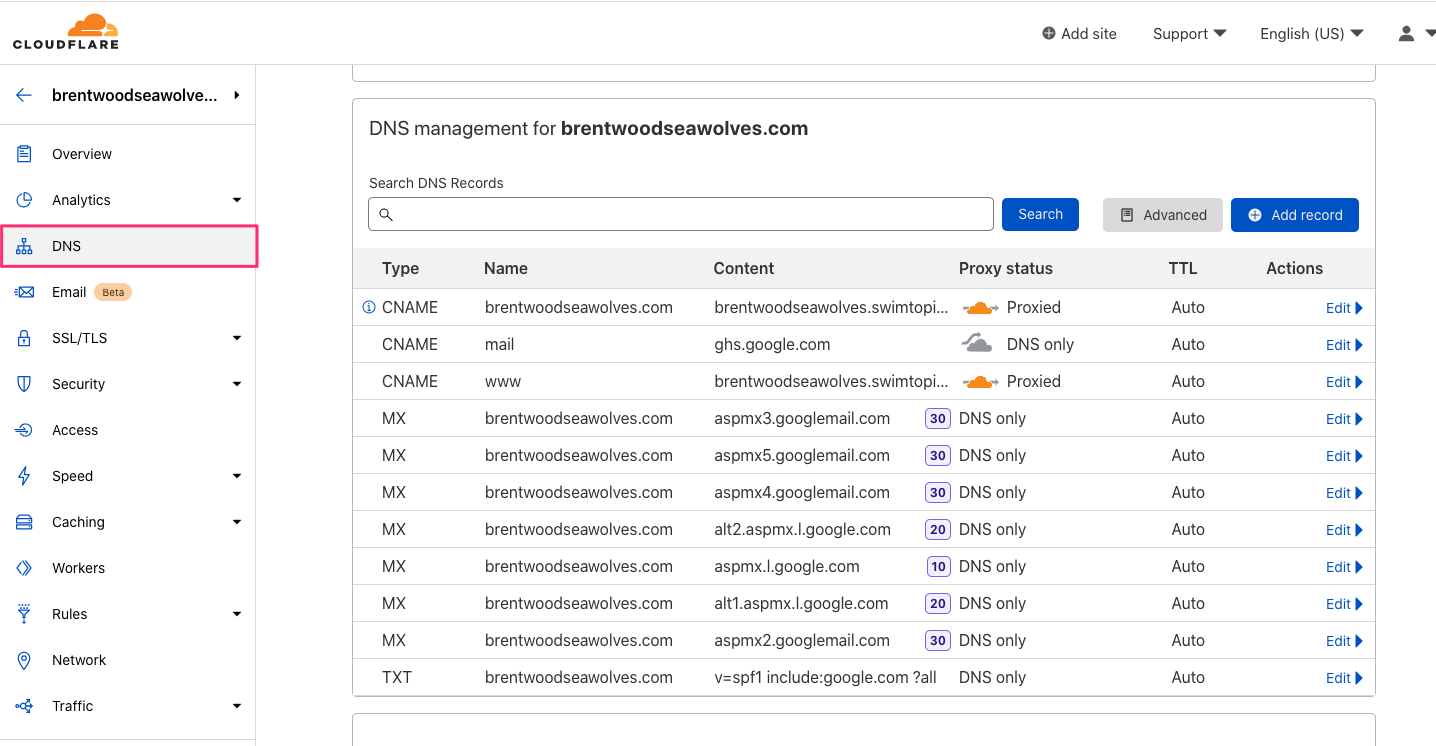 |
hcmanagewebsitesitesettingsadvanced
Comments
2 comments
Works like a charm, thank you very much!
If you have any problems setting up a custom domain, please reach out to help@swimtopia.com for assistance.
Article is closed for comments.